 Fixes to STB Original Mode
In this Issue:
 Q: “We've been getting RMA's from end users buying SATA drives saying they have "bad sectors." I don't know what test they use to determine this, but they pass a DST and SMART test when I plug them in. I was just wondering what else I can do to test for for bad sectors on SATA drives so that I can start doing that before shipping them out.
Thanks,”
A: Hello... some further questions...
Are you wanting to test that every sector on a drive can be written and read back correctly, as in writing a pattern then reading with data compare, failing if the compares don’t compare?
If so use a simple DMM test sequence of:
Or are you trying to determine if a drive is having problems but is getting past them using ECC or retries?
In this case you’ll need to look at the drives history, using View Log Pages for SAS/SCSI/FC,or View SMART Data for SATA.
Or are you trying to determine if a drive has had data errors in the past?
Same as above, you need to see the drives history of what error correction it’s had to do.
I think it would be pretty rare to not have any reallocated sectors on a drive…
You can see how many reallocated sectors a SATA drive has by looking at its SMART data.
Go to STB original mode->ATA/SATA->Commands-View SMART Data and select your drive.
SMART attribute 5 is the reallocated sector count – here’s one of my drives –
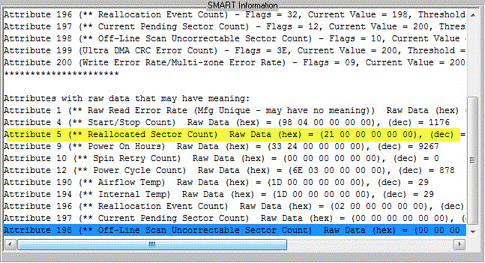
If you want to screen for these errors, in DMM you’d choose the SMART test step then define your criterion like this –
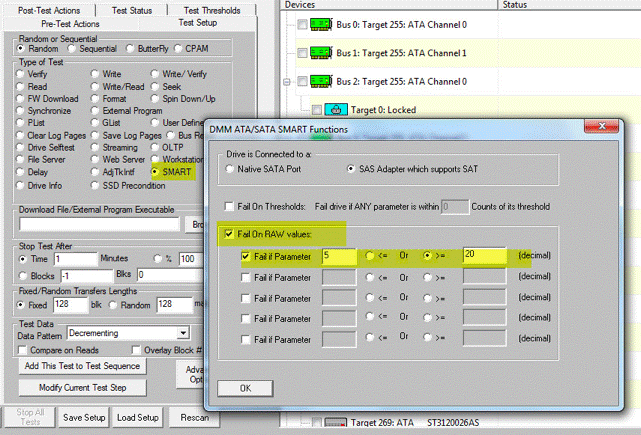
Add this test step into your test sequence. Then when you test any SATA drive that has more reallocated sectors than you defined will fail and the info will all be logged.
You can see how many reallocated sectors a SAS/SCSI/FC drive has by looking at its Log Page data.
Go to STB original mode and select your drive.
Right-click on the drive and choose View Log Pages -
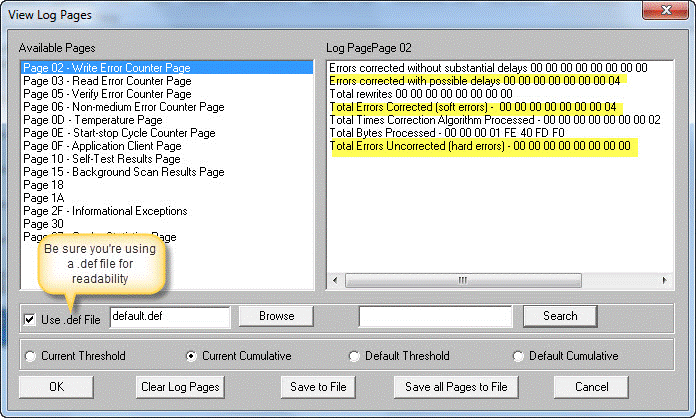
This example shows a drive that has done 4 error corrections on Writes since the last time the log pages were reset. An “error corrected with possible delays” is most likely an error that required either a re-seek, or an error that required remapping the destination LBA.
You can also double-click on a drive, then select the Error Data tab
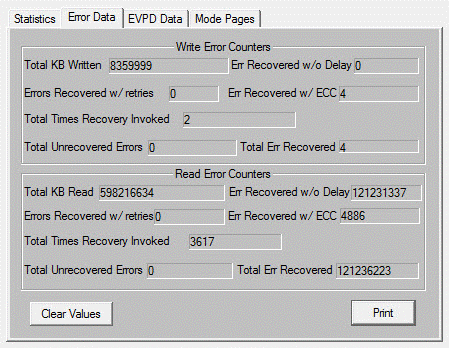
To see the drives error history.
If you want to screen for these errors in DMM click on the Test Thresholds tab and either use the Re-Reads or Re-Writes fields, or you can explicitly specify a Log Page/Log Paramemer/Value
combination.

Many times drives will have been “short-stroked” for various reasons. Short-stroking means to set the capacity to be less than the full factory capacity. This might be done in a high-performance server environment to limit the amount of surface used in the drive in order to minimize what the worse-case seek time would be. Or, perhaps a particular computer system requires a certain sized drive - short-stroking can allow a newer larger drive to be used in this type of older system.
You may need to restore the drive to its full capacity, perhaps to resell/repurpose the drive. Or you just may want to test the entire drive, not just a smaller part of full. In these cases you need to restore the drive back to it’s original, full, from-the-factory capacity.
Click on the Pre-Test Actions tab in the DMM menu. Pre-test actions, as their name implies, are actions done to all selected drives before a test sequence is run. There are several things you can do here, for instance:
In this article we’re going to do a special variation of changing the capacity of the drives under test.
Normally you would specify the exact capacity, in number of blocks, that you want the drive to be set to. But you may not know what the original full capacity of your drives are. Or you may be testing several different sized drives at the same time
In this case instead of entering a specific number of blocks, you simply enter the word FULL in the capacity field. Now when you start your DMM test, DMM will execute the Pre-Test Action of restoring full capacity to each selected drive, then it will go on to run your test sequence. Here’s a picture of how to set this up -
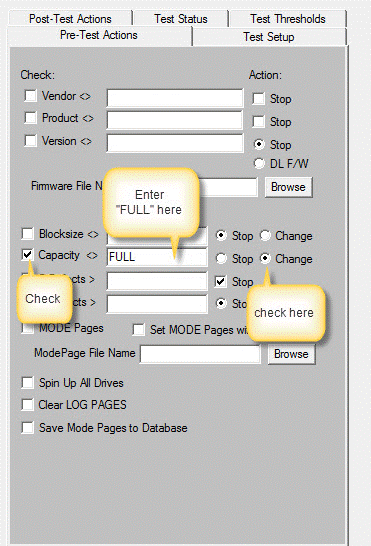
That’s all to it! As we mentioned, you are able to mix drives of differing capacities - DMM will take care of restoring each drive to its individual full from-the-factory capacity.
This functionality is only available for SAS/SCSI/FC drives, not SATA.
The reason for this is that SATA drives,unlike SAS/SCSI/FC, require a power-cycle after their capacity has been changed. This does not work well in an automated environment such as DMM. But stay tuned, we are working on a workable real-world solution for this problem.
In general, to use these DMM Add-In tests you need to:
 To make sure you are running the latest version of the STB Suite and are notified ASAP on the new releases be sure to follow the outline below.
SCSI Toolbox, LLC - PO Box 620520 - Littleton, CO 80162-0520
Sales: 720.249.2641
General: 303.972.2072
Questions or Comments
www.stbsuite.com
If you want to cancel your subscription, click here