SCSI Toolbox, LLC - SCSItoolbox Release Notes
STB:
Fixes/Changes:
- In Buffer->File Operations->Read/Write from Disk – took away limiting transfer size to 128 blocks.
- fixes reading SMART raw data which is 6-bytes in length.
- It also presents raw SMART data in an easier to read comma delimited way i.e. 1,234,567 instead of 1234567
- Recover Security Locked Drive, Unlock Drive & Disable Password fixed
DMM:
New Features:
- Background Scan Event Count Screening added to Threshold tab
- Number of drives selected displayed below device window
- Three (3) SSD-specific test sequences added
- Full Purge w/Certificate
- Quick Wipe
- WRITE Saturation test
Background Scan Event Screening in DMM
Introduction
Starting in STB Suite version 10.2 there is a new threshold available for drive screening in DMM – screening by Background Scan error event count.
What is BackGround Scan?
Read this article in our Virtual Training Center for full information on what Background Scan (BGS) is, how to enable/disable it, etc.
http://www.stbsuite.com/support/virtual-training-center/background-scan-operations
How Does DMM report Background Scan results?
DMM will log all BGS information when a Save Log Pgs test step is run.
Here is an example of a DMM .log file when a Save Log Pgs test step was run –
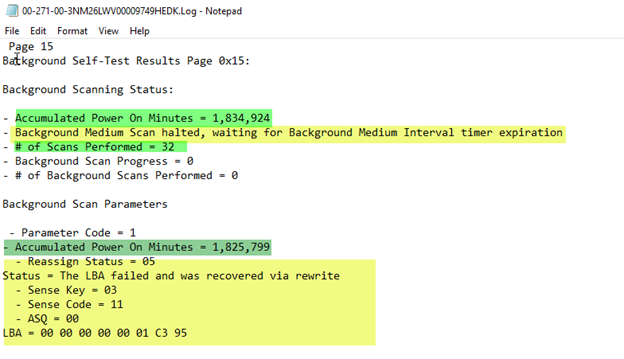
Important things to note:
The Background Scanning Status section gives an overall report showing
- Power On Minutes at the time that the Save Log Pgs test was run.
This drive shows 1,825,799 minutes, or a POH of 30,430 hours.
That’s a total of 1,268 days that the drive has been powered up!
- Status of the current scan. This example shows that a BGS is currently halted and waiting for the drives’ BGS timer to expire. See the above referenced paper about BGS for more details on this.
- Number of Scans Performed
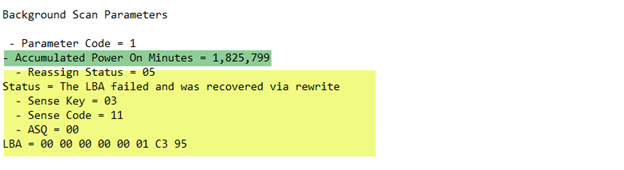
Next, the Background Scan Parameters will show the details of any BGS events.
There will be one Background Scan Parameter entry for each event (or problem) occurring during the BGScans. There can be a maximum of 2048 of these parameter entries. If the drive has had more than 2048 events then the last entry (parameter 2048) will be re-written over and over.
Here is the first Parameter Entry from our example drive. This particular drive has 101 entries.
Here is the 101st final entry -
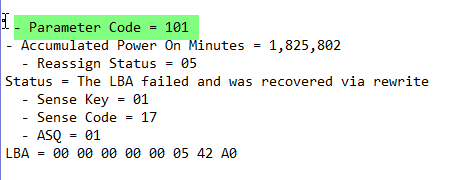
Note the different between the Accumulated Power on Minutes of the first event versus the last event. This drive has basically run fine for a long time but is now accumulating these errors, starting at 1,825,799 POM.
Yes, the entries in this case are all recovered, but recovery via rewrites takes time and affects performance.
Since the drive used to not have problems but now does we would suspect that this drive is on its’ way out. In other words, it is becoming bad.
As this shows, there is a lot of valuable information logged for each event. Was it a correctable error or not? If it was correctable, how was it corrected? What LBA did the error occur at?
Careful analysis of the progression of events will help you decide whether to consider a drive as being bad or not.
New Background Scan Event Count Screening
The new BGS Event Count Screening threshold in DMM vs 10.2 will help you with screening drives based on how many events the drive reports.
The settings for this new Threshold are found on the DMM Test Thresholds tab –
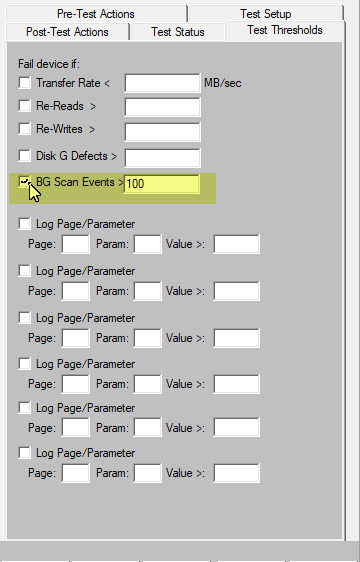
Setting up screening on BGS events is simply a matter of checking the BG Scan Events checkbox and entering the maximum number of events you will tolerate. As in all of the Test Thresholds, they will be checked after each test step is run.
The DMM .log file will show that the BGScan Event Count threshold was checked, what the user-defined screening threshold was set to and how many events the drive reports.
If the drive reports a number of events greater than your threshold setting then the drive will be marked as failed.
In this example we have set the Test Thresholds tab to enable screening on BGS Events, and have set a limit of 100 BGS events to determine that a drive is bad.
In the case of our example drive, it would be failed upon testing.
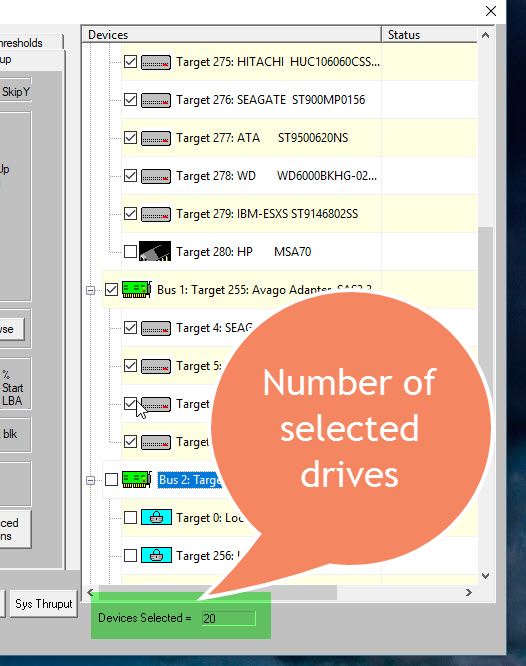
- Number of drives selected displayed below device window
As you select or deselect drives in the Devices window the currently select number is displayed –
DMM SSD-Specific Test Sequences
SSD – Full Purge with certificate
This DMM test sequence will fully wipe a SATA SSD drive, filling all LBAs with the All-Zeros data pattern.
Then all LBAs are READ using Data Compare to guarantee that all user data is gone and all blocks are filled with zeros.
In addition to the DMM log files a Purge Certificate will be created using the default purge certificate template.
Pre-Test Configuration:
=======================
<none>
Test Summaries. 2 Tests Defined:
=================================
TEST 1 of 2:
Purge Test
Timeout Value = 30
Action on Error: Stop Current Test
Special Text For Test: SATA Secure ERase to purge/wipe disk
SATA SE Purge, Normal
Create Certificate from Template File C:\Program Files (x86)\STB\SCSI toolbox32\DefaultPurgeCertificate.txt
TEST 2 of 2:
Read Test; Sequential; for ALL Blocks
Fixed-Length Transfers of 128 (0x0080) Blocks
Start Block: 0 (0x0)
Data Pattern: All Zeros; Data Compare ON
Queue Depth = 1
FUA = OFF
Number of Workers = 1
Timeout Value = 30
Action on Error: Stop Current Test
Special Text For Test: Read all blocks - data compare; check that all LBAs are zeroed
Post-Test Configuration:
========================
<none>
SSD – Quick Wipe
This test sequence will run in approximately 2 minutes or less. It will use the SATA SA command to secure erase the SSD. Then a READ test with data compare is run for one minute using the Butterfly access method to confirm that a sampling of the drive is indeed purged.
Pre-Test Configuration:
=======================
<none>
Test Summaries. 2 Tests Defined:
=================================
TEST 1 of 2:
Purge Test
Timeout Value = 30
Action on Error: Stop Current Test
Special Text For Test: SATA SE to purge disk
SATA SE Purge, Normal
TEST 2 of 2:
Read Test; ButterFly; for 1 Minutes
Fixed-Length Transfers of 128 (0x0080) Blocks
Start Block: 0 (0x0)
Data Pattern: All Zeros; Data Compare ON
Queue Depth = 1
FUA = OFF
Number of Workers = 1
Timeout Value = 30
Action on Error: Stop Current Test
Special Text For Test: 1 minuttterfly READ check for all zeroes
Post-Test Configuration:
========================
<none>
SSD – Write Saturation
This test sequence will first issue a SATA SE command to secure erase the SSD. It will then WRITE all blocks of the SSD using a Random data pattern, 4K per transfer I/O size, and using the CPAM Random access method to insure that every LBA has been written.
As per the SNIA write saturation specification this test will write to the drive 4 times, insuring that 4 X the drive capacity is written.
The transfer rate to the drive is recorded after each full write pass to the drive.
Pre-Test Configuration:
=======================
<none>
Test Summaries. 5 Tests Defined:
=================================
TEST 1 of 5:
Purge Test
Timeout Value = 30
Action on Error: Stop Current Test
Special Text For Test: SATA SE to purge disk
SATA SE Purge, Normal
TEST 2 of 5:
Write Test; CPAM Access; for ALL Blocks
Fixed-Length Transfers of 8 (0x0008) Blocks
Start Block: 0 (0x0)
Data Pattern: Random
Queue Depth = 1
FUA = OFF
Number of Workers = 1
Timeout Value = 30
Action on Error: Stop Current Test
Special Text For Test: Write ;full disk 4 times to saturate drive
TEST 3 of 5:
Write Test; CPAM Access; for ALL Blocks
Fixed-Length Transfers of 8 (0x0008) Blocks
Start Block: 0 (0x0)
Data Pattern: Random
Queue Depth = 1
FUA = OFF
Number of Workers = 1
Timeout Value = 30
Action on Error: Stop Current Test
Special Text For Test: Random WRITE 4KBLK 2 hours to saturate drive
TEST 4 of 5:
Write Test; CPAM Access; for ALL Blocks
Fixed-Length Transfers of 8 (0x0008) Blocks
Start Block: 0 (0x0)
Data Pattern: Random
Queue Depth = 1
FUA = OFF
Number of Workers = 1
Timeout Value = 30
Action on Error: Stop Current Test
TEST 5 of 5:
Write Test; CPAM Access; for ALL Blocks
Fixed-Length Transfers of 8 (0x0008) Blocks
Start Block: 0 (0x0)
Data Pattern: Random
Queue Depth = 1
FUA = OFF
Number of Workers = 1
Timeout Value = 30
Action on Error: Stop Current Test
Post-Test Configuration:
========================
<none>
|